WordPress has become one of the most used tools worldwide when creating a web page thanks to many templates and plugins that it provides, which allow practically anything to be done, especially the best WordPress malware removal tool.
According to WordPress, a web development company, cleaning a hacked WordPress site is not easy. Unfortunately, the security of a WordPress site is not to be taken lightly. Being hacked can happen to anyone by being a WordPress malware scanner.
Hacked and need it fixed now? We remove WordPress malware with same-day turnaround — fixed price.
Signs Your WordPress Site Is Hacked
Your WordPress website may be compromised if you notice one or more of these symptoms:
- Your website redirects visitors to another website.
- Strange or spam URLs appear in Google Search Console.
- Google displays a “This site may be hacked” warning.
- Your hosting provider suspends your account because of malware.
- Unknown administrator accounts appear in WordPress.
- Strange pages, posts, or links appear on your website.
- Your website displays unexpected advertisements or pop-ups.
- WordPress files contain unfamiliar PHP files or code.
- Your website becomes unusually slow.
- A security plugin reports malware or suspicious files.
If you notice these signs, don’t immediately delete random files. First create a backup and investigate the infection.
How to Remove Malware From Your WordPress Website
Now let us see the step by step process to remove malware from your WordPress website.
Step 1: Back Up Your WordPress Site
Before removing malware, create a complete backup of your WordPress files and database.
If your hosting provider offers snapshots or backups, create one before making changes (if your host does not, consider moving to a low-cost WordPress host). You should also keep a separate copy of important files and the database so you have something to investigate if the cleanup goes wrong.
Make sure your backup includes:
- WordPress files
wp-contentwp-config.php.htaccess- Database export
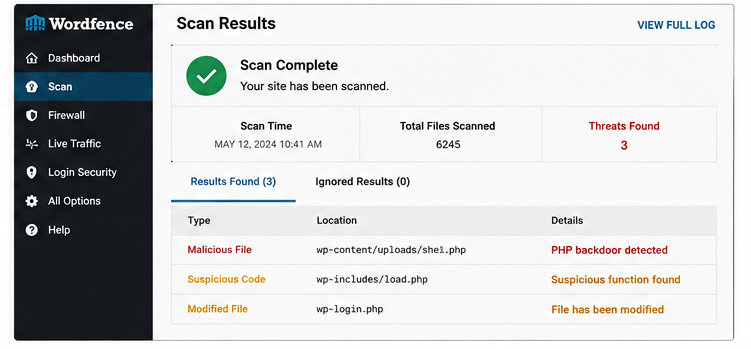
Step 2: Run a Wordfence Malware Scan
Install Wordfence and run a full scan of your WordPress website.
Wordfence can help identify modified WordPress core files, suspicious plugins and themes, malware, and other files that require investigation.
Review the scan results carefully before deleting anything. Not every unusual file is necessarily malicious.
Step 3: Check Your Website with Sucuri SiteCheck
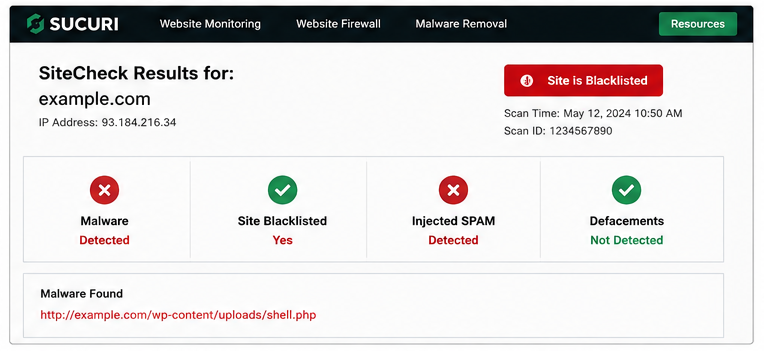
Run your website through Sucuri SiteCheck as a second security check.
An external scanner can help identify publicly visible malware, suspicious redirects, blacklist warnings, and other issues.
Using both an internal WordPress scanner and an external scanner gives you another way to verify the infection and cleanup.
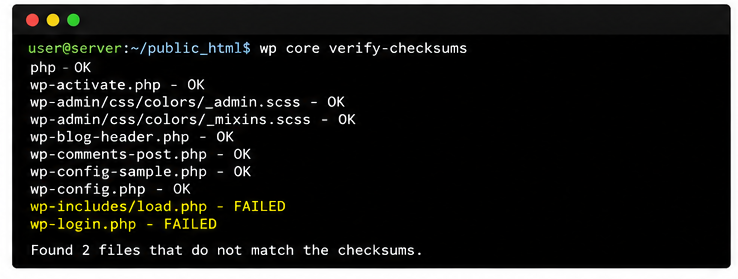
Step 4: Verify WordPress Core Files with WP-CLI
If you have SSH access to your hosting account, use WP-CLI to verify that your WordPress core files match the official checksums.
Run:
If WordPress reports files that don’t match the expected checksums, investigate them before replacing or deleting them.
This is especially useful for detecting modifications to legitimate WordPress core files.
Also Read: Why People Choose WordPress To Develop A Business Website?
Step 5: Check wp-content/uploads for Backdoors
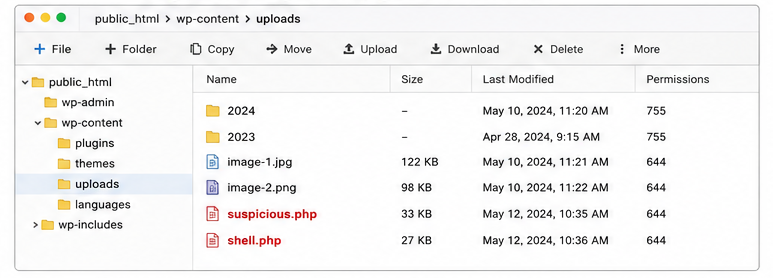
The wp-content/uploads directory normally contains images, documents, and other media uploaded to your website.
Look for unexpected PHP files or other executable files that you did not intentionally upload.
For example:
A PHP file inside an uploads directory deserves investigation because attackers sometimes hide backdoors there.
Do not blindly delete files. Confirm what each file is before removing it.
Step 6: Check for Unauthorized WordPress Users
Go to:
WordPress Dashboard → Users
Look for administrator accounts or other users that you don’t recognize.
If an attacker gained administrator access, they may have created a new account to maintain access to your website.
Remove unauthorized accounts after confirming that they are not legitimate users.
Also change passwords for:
- WordPress administrators
- Hosting account
- FTP/SFTP
- Database
- SSH
- Other services connected to the website
Step 7: Inspect the .htaccess File
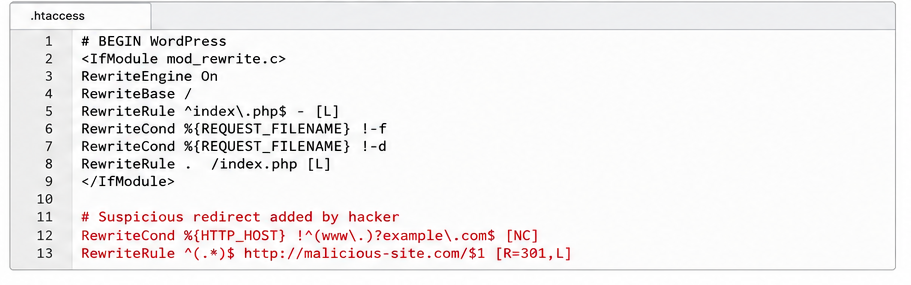
Open your .htaccess file and look for suspicious redirects or rules that you didn’t create.
Pay attention to:
- Unexpected redirects
- Unknown rewrite rules
- External domains
- Encoded or suspicious code
- Rules targeting search engines or specific visitors
Also check other important configuration files such as:
depending on your hosting environment.
Step 8: Reinstall Clean WordPress Core Files
After identifying the compromised files, reinstall WordPress using a clean copy from the official WordPress distribution.
Do not reuse potentially infected WordPress core files from your backup.
Your content, themes, plugins, and configuration should be handled separately so you don’t accidentally copy malware back into the new installation.
Step 9: Reinstall Plugins and Themes
Download plugins from their official sources or trusted premium developers.
Do not restore old plugin files if you suspect they were compromised.
Remove plugins and themes that are:
- No longer maintained
- Unused
- Downloaded from untrusted sources
- Known to contain vulnerabilities
Install fresh copies and update them to their latest secure versions.
Step 10: Re-scan and Test Your WordPress Website
After cleaning the website, run another security scan.
Check:
- Homepage
- Important landing pages
- Login
- Forms
- Checkout
- Redirects
- Images
- Plugins
- WordPress admin
- Google Search Console
Also scan the computer you use to manage the website. If the original password was stolen from an infected computer, cleaning the website alone may not prevent another compromise.
After Cleaning: Request a Google Review
If Google detected malware or hacked content on your website, cleaning the files is only part of the recovery process.
Open Google Search Console → Security & Manual Actions → Security Issues and check whether Google has reported hacked content or malware.
After confirming that the website has been cleaned, re-scanned, and tested, request a review through Google Search Console.
Before requesting the review, make sure you have:
- Removed the malware.
- Removed unauthorized users.
- Fixed suspicious redirects.
- Updated WordPress.
- Updated plugins and themes.
- Changed compromised passwords.
- Re-scanned the website.
- Tested the important pages.
If the website was placed on a security or browser blocklist, you should also follow the appropriate review/removal process after the infection has been fixed.
Hacked and need it fixed now? We remove WordPress malware with same-day turnaround — fixed price.
WordPress development services